Chimichurri is hands down one of my favorite sauces to keep on hand because it goes with just about everything. Spoon it over steak, grilled chicken, seafood, roasted vegetables, sandwiches, or grain bowls, and it instantly makes the entire meal better.
One of the reasons I love it so much is that it’s also incredibly freezer-friendly. Since it’s built on an oil base, it holds up surprisingly well in the freezer and maintains its texture and structure when you’re ready to use it later. As we’ve talked about throughout this site, choosing ingredients and techniques that survive the freezing process is what separates a great freezer meal from a disappointing one, and chimichurri checks all the boxes.
I was first introduced to chimichurri years ago while working in restaurants as a bartender. Whenever I had the chance, I’d sneak into the kitchen to try whatever the chefs were working on before it made its way onto the menu. Chimichurri was one of those things that immediately stuck with me. It was simple, fresh, packed with flavor, and somehow made everything it touched taste better.
Since then, it’s become a staple in my house. My wife loves it, I put it on everything I can get away with, and it’s one of those recipes I find myself coming back to again and again.
So if you’re looking for a sauce that’s bright, herbaceous, incredibly versatile, and freezer-friendly, this is my favorite chimichurri recipe.
Chimichurri (Quick Guide)
- Prep Time: 15–20 minutes
- Cook Time: None
- Total Time: 15–20 minutes (plus resting time)
- Servings: Approximately 8 servings
- Difficulty: Easy
- Freezer Friendly: Yes
- Best Served With: Steak, seafood, chicken, vegetables, grain bowls, sandwiches, and eggs
Why You’ll Love This Recipe
You’re going to love this chimichurri recipe for a lot of different reasons.
First, it’s fresh, vibrant, and incredibly versatile. You can spoon it over steak, seafood, chicken, roasted vegetables, sandwiches, grain bowls, or just about anything else you can think of. No matter what you pair it with, it has a way of elevating the entire dish. It brings a brightness and freshness that can make even the simplest meal feel special.
One of the things I love most about chimichurri is how balanced it is. It has the perfect combination of salt, fat, and acidity. The olive oil adds richness, the vinegar brightens everything up, and the herbs bring freshness that ties it all together.
And then there’s the aroma.
As you’re finely chopping the parsley and garlic, your entire kitchen starts to smell like fresh herbs. Everyone in the house knows exactly what’s being made, and they’re already looking forward to eating it before it’s even finished.
Another thing I love about this recipe is how it changes over time. It’s delicious the moment you make it, but as it sits, the flavors continue to develop and intensify. Try it right away, then taste it again a few hours later or the next day, and you’ll notice how the herbs, garlic, oil, and vinegar come together even more.
Best of all, it’s incredibly beginner-friendly.
It’s quick to make, difficult to mess up, and one of those recipes that naturally teaches you how to cook by taste. Maybe it needs a little more salt, another splash of vinegar or olive oil to mellow everything out. It encourages you to trust your palate and make small adjustments until it tastes exactly the way you want it to.
And once you do, I have a feeling you’ll find yourself making it again and again—just like I have.
Disclosure: This article may contain affiliate links. As an Amazon Associate, I earn from qualifying purchases at no extra cost to you.
Ingredients
- 1½ cups fresh parsley, finely chopped
- 1 cup extra virgin olive oil
- ⅓ cup red wine vinegar
- 2 garlic cloves, finely diced
- 1 tablespoon red pepper flakes
- 1 teaspoon dried oregano
- ½ tablespoon salt
- ½ teaspoon black pepper
Recipe Tips
- Use the freshest parsley available.
- I recommend removing most of the parsley stems before chopping to reduce bitterness.
- Use an olive oil you actually enjoy the taste of since it’s the base of the sauce.
- If you’re sensitive to acidity, start with slightly less vinegar and adjust to taste.
- One tablespoon of red pepper flakes gives this recipe a noticeable kick.
How to Make This Chimichurri
Step 1: Gather Your Ingredients
I always start with mise en place. Lay everything out in front of you before you begin so the process feels organized and enjoyable.
Step 2: Prepare the Parsley
Wash the parsley thoroughly.
Using your thumb and index finger, slide firmly up each stem to strip away the leaves. Repeat until all of the parsley has been picked clean.
Roll the leaves tightly together and finely chop them by hand.
Place the chopped parsley into a large mixing bowl.
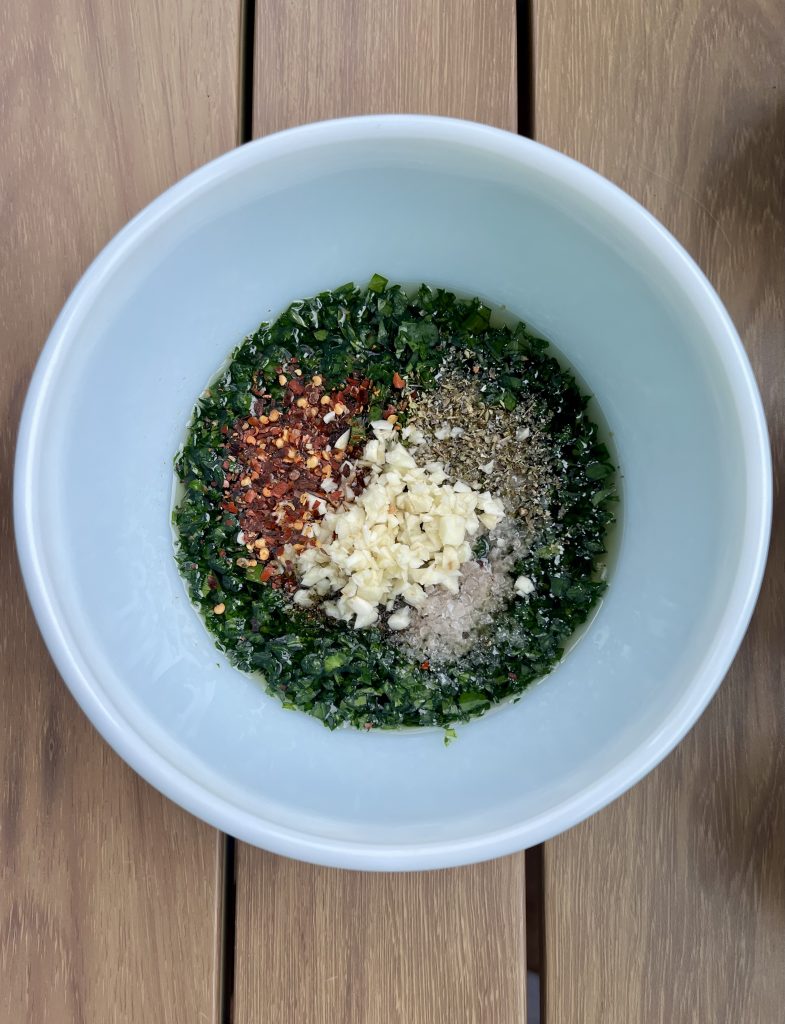
Step 3: Add the Remaining Dry Ingredients
Add the diced garlic, oregano, red pepper flakes, salt, and black pepper to the bowl.
Mix to distribute everything evenly.
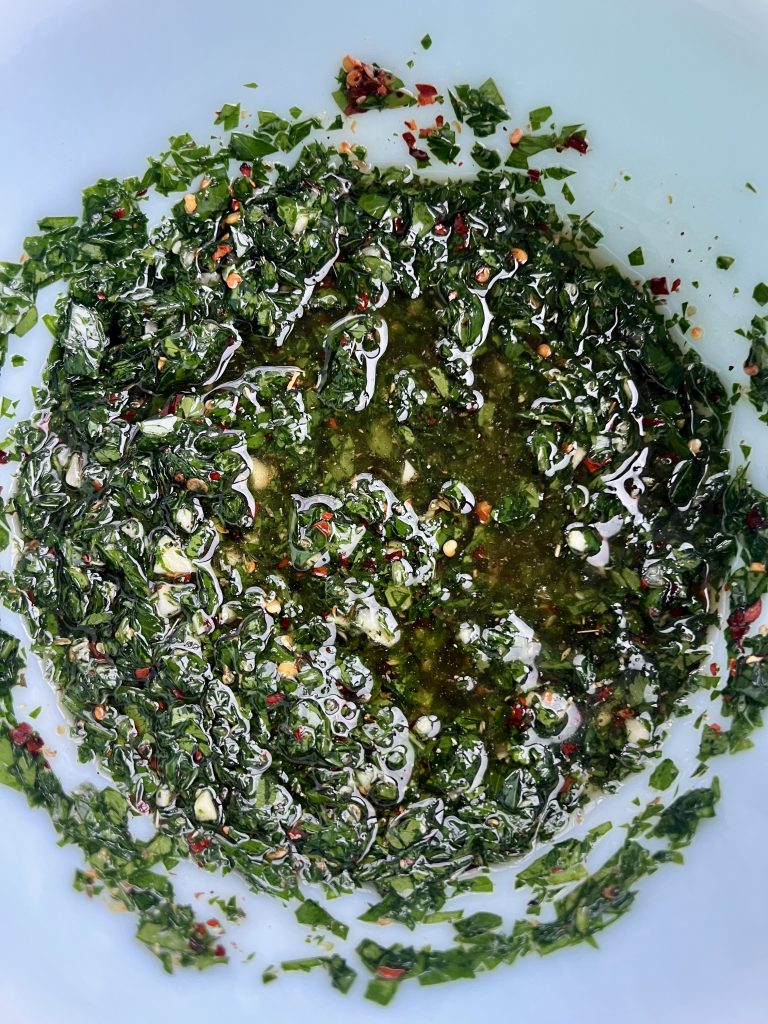
Step 4: Add the Oil and Vinegar
Pour in the olive oil and red wine vinegar.
Stir until everything is thoroughly combined.
Step 5: Taste and Adjust
Taste the chimichurri.
Maybe it needs a little more salt. Maybe another splash of vinegar. Make small adjustments until it tastes exactly the way you want it to.
Step 6: Let It Rest
Cover the bowl and refrigerate.
Although you can serve it immediately, I think chimichurri is best after it has rested for at least a few hours.
I’ll often taste it every few hours and make adjustments before serving.
Pro Tips
Remove the Parsley Stems
Taking a few extra minutes to remove most of the stems creates a better texture and reduces bitterness.
Dry the Parsley Thoroughly
After washing the parsley, dry it completely before chopping.
Excess water can dilute the flavors and throw off the balance between the olive oil and vinegar.
Taste and Adjust
This isn’t a recipe you mix once and forget about.
Taste as you go and make small adjustments until it tastes exactly the way you want it to.
Let the Flavors Develop
Like a good bolognese, chimichurri changes over time.
Let it sit for 20–30 minutes, taste it again, and don’t be afraid to tweak it before serving.
What to Serve Chimichurri With
If I had to choose one thing, it would be a beautifully seared steak.
I love slicing the steak into thin strips and spooning the chimichurri over the top just before serving. The bright herbs make it look fresh and elegant, while the garlic, vinegar, and olive oil cut through the richness of the meat perfectly.
It’s a guaranteed crowd-pleaser.
Chimichurri also pairs beautifully with:
- Grilled shrimp and seafood
- Chicken breasts or thighs
- Roasted potatoes
- Grilled vegetables
- Rice bowls
- Sandwiches and wraps
- Eggs
Once you have a batch in the fridge, you’ll start finding excuses to put it on everything.
Storage and Freezing
Stored in an airtight container in the refrigerator, chimichurri will typically last for 1–2 weeks.
That said, I think it’s at its absolute best during the first few days after making it. The flavors continue to develop, but after about 1–3 days, some of that bright herb flavor begins to fade.
If you won’t use it all right away, chimichurri freezes surprisingly well.
My favorite method for freezing is to portion it into individual silicone ice cube trays. Once frozen solid, transfer the cubes to an airtight freezer bag or container.
Check out the exact silicone trays I use here.
Pull out exactly what you need whenever you want to add a burst of flavor to a meal.
Properly stored, frozen chimichurri will maintain its quality for approximately 3–6 months.
Recipe Card
Prep Time: 15–20 minutes
Cook Time: None
Total Time: 15–20 minutes plus resting time
Servings: 8
Ingredients
- 1½ cups fresh parsley, finely chopped
- 1 cup extra virgin olive oil
- ⅓ cup red wine vinegar
- 2 garlic cloves, finely diced
- 1 tablespoon red pepper flakes
- 1 teaspoon dried oregano
- ½ tablespoon salt
- ½ teaspoon black pepper
Instructions
- Wash and dry the parsley thoroughly.
- Remove most of the stems and finely chop the leaves.
- Add parsley to a mixing bowl.
- Stir in garlic, oregano, red pepper flakes, salt, and pepper.
- Pour in olive oil and red wine vinegar.
- Mix thoroughly.
- Taste and adjust seasoning as needed.
- Refrigerate for 20–30 minutes before serving.
Notes
- Best enjoyed within 1–3 days.
- Freeze leftovers in ice cube trays for future use.
- Taste before serving and adjust if necessary.
Want a complete freezer meal system? Get the free blueprint.
Final Thoughts
If I had to choose one sauce to always keep in my fridge or freezer, chimichurri would be near the top of the list.
It’s fresh, versatile, easy to make, and somehow manages to make everything it touches taste better. Whether you’re spooning it over a perfectly seared steak, tossing it with vegetables, or freezing portions for future meals, I hope it becomes a staple in your kitchen the same way it has in mine.
Looking for the tools behind this system?
View Recommended Tools
About the Author
Here at Cook Once Eat Later we share freezer meal recipes, meal prep systems, and practical freezing guides designed to help busy people save time without sacrificing flavor. Our focus is helping meals retain their texture, moisture, and quality long after they’ve been frozen.
Follow Cook Once Eat Later on Instagram for freezer meal tips, recipes, and meal prep inspiration.
FAQ
Can you freeze chimichurri?
Yes. Chimichurri freezes very well thanks to its oil-based structure. Ice cube trays make portioning easy.
How long does chimichurri last in the fridge?
Stored properly in an airtight container, it will last 1-2 weeks fresh. However, I think it’s best within the first 1–3 days.
Can I use a food processor?
You can, but I prefer chopping everything by hand. It preserves the texture of the herbs and prevents the sauce from becoming a paste.
Can I make chimichurri ahead of time?
Absolutely. In fact, I think it tastes better after resting for a few hours.
Is chimichurri spicy?
This version has a slight kick from the red pepper flakes. Reduce the amount if you prefer a milder sauce.